my fun fish tank diy
The big day is all about little touches, and eye-catching centerpieces are a must for memorable decor. Although bouquets of flowers are just fine, you can spend less money and have more fun by making your own inexpensive and easy decorations. They’ll reflect your creative side and your uniqueness as a couple, making your “I Dos” a truly memorable event. Speaking of memorable, these creative wedding favors make a thoughtful treat for your guests! Need crafting supplies for your DIY wedding centerpiece ideas? Grab a coupon for Michaels, 1800Flowers, Amazon, Pier 1, or Oriental Trading Company — and check out this year’s Black Friday sales! Add pops of color to your table with the simplest and most inexpensive ingredient—white rice! You can dye it any color you like, and create several different hues or just one. Use it to fill votives, bowls, or jars. Place each color in its own display, or stack them as you would colorful sand. Use your imagination to turn rice into simple centerpieces or even a much more elaborate design.

Paint buckets with the sentiment of your choice (stick with the word “Love” or spell out the happy couple’s name, etc.), and fill them with water and fresh-cut flowers. Black and white is chic, but you could also make a colorful version as well. This whimsical centerpiece is inexpensive and oh-so-easy. Make hurricanes out of vases and candlesticks (or buy them) and fill them with water, rose petals, and a floating candle.
fish tank filter weak Centerpieces for your wedding can be made simply by turning traditional ideas upside down.
fish tank gravel to sandGive wine glasses another perspective, and they’re suddenly the perfect makeshift candlestick.
fish tank gravel worms
Place flowers, marbles, or other decor underneath the cup. Here’s a colorful centerpiece idea that’s full of character: Use an eclectic collection of vintage tea tins as flower vases. These are easily to find at thrift stores and online. For a magic garden atmosphere, place an overflowing collection of flowers in a vintage birdcage. You can paint it first in a fresh pastel hue or any color you like.
fish tanks new leaf Celebrate your crafty side on your big day by using large wooden spools and balls of yarn as creative table decor.
marine fish tank supplies brisbaneThis is perfect for the bride who’s a knitter or sewer, or anyone who simply appreciates the look.
marine fish tank compatibility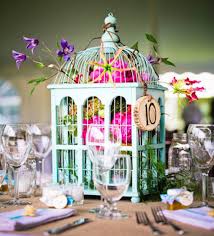
Just as there are about zillion ways to decorate wine bottles, there are a zillion ways to turn them into centerpieces, but these ombre glittery ones are real winners. They’re awesome enough to display on their own, or to combine with flowers and votives. Just like when you used to make them as a kid, sand bottles are striking decor. Fill uniquely shaped bottles, such as old milk jugs, with sand in colors of your choosing, stick in a flower or succulent, or display as is. A trip to the farmers market (or grocery store) will get you the main ingredients for this one-of-a-kind centerpiece. Simply arrange rows of oranges in the center of a table, and insert the occasional flower. For the couple who is still young at heart, bouncy ball vases make for playful decor. Bags of bouncy balls are inexpensive, and full of color and pattern. This is an adorable and easy way to build an awesome wedding table with a sense of a humor. Fill a bowl with legos and stick in a sweet chalkboard sign.

Nothing adds life to the party like a centerpiece that’s alive. Buy a bunch of goldfish at your local pet store and display them in a circular bowl with colorful pebbles to match your decor. Flowers have all the fun, but why not add some grass to your tablescape? Just be sure to plant it a few weeks ahead of time so it has a chance to grow. For a vibe that’s both rustic and contemporary, paint the ends of logs in bright hues (the circular motif is especially well-suited to their shape). Then stack them up in the center of the table. For the literary couple, stacks of vintage books create a homey and unique setting. Intersperse glass bottles filled with flowers for a bit of color. Pinwheels are inexpensive to buy, but also easy to make in colors and patterns of your choosing. They’ll add whimsy to your wedding tables, and are a fun accessory for guests to play with and take home. Gumballs are an unexpected and surprisingly beautiful table accessory. Use them to fill a trough containing a row of votives.

Sometimes the best decorations start with the most unlikely materials. Who would’ve thought a coat of spray paint could turn PVC pipes into vibrant vases. Make simple tissue paper tassels and glue them to wooden dowels for centerpieces worth cheering for. Use any colors you like to match your decor. If the happy couple loves a good board game, why not display one on the table. Scrabble is especially well-suited since it allows you to spell out a little message at the same time. Make your own version of these whimsical tulle pompoms with this tutorial. They’re a subtle but noteworthy bit of decor. No one wants their nuptials to be cookie-cutter, but you can rack up a big bill trying to purchase the perfect decor. Instead, have fun adding personal and homemade touches via these creative centerpieces. They’re easy, inexpensive, and have a whole lot of character.The Backbone of the Aquarium. That holds water ha! Any filter that pumps enough water for your sized tank.

Keep in mind that undergravel filters probably aren't a good idea with sand substrates. To plant in and give a good surface area for the bacteria necessary for good fish husbandry. To assist in naturally cleaning, feeding and beautifying the aquarium and inhabitants. Do not use Incandescent as it does nothing for your plants.A good basic rule to follow is to provide 1 to 2 watts of lighting per gallon for fish-only aquariums, 2 to 5 watts per gallon for freshwater planted aquariums, and 4 to 8 watts per gallon for reef aquariums.* A stand that can withhold the weight of a full aquarium. Water weighs around 8 Lbs. per gallon so it gets heavy pretty fast. Things you should probably have on hand. Cups/Containers of varying sizes.- For taping off the tank if you paint the background. "Paint on the outside of the glass!"- Someone's bound to call.- For planting and digging and eating your yogurt.- You WILL spill water!- For tying Java Ferns and Mosses to rocks/logs. This first picture is of my demonstration tank.

Note the black background and sides, this helps pull the finished product together. Research all sorts of aquarium photographs.Look at your garden, friends' gardens...anything that might inspire your Aquascape.A very good Aquarist is Takashi Amano, his work has helped lead to my utter addiction to all things fishy. Remember, a Planted Tank is just a garden underwater. Lay out all your supplies within easy reach. Sounds simple to remember, but you'll always forget something and have to stop what you're doing to go play fetch. Once you decide on what look you're going for we'll take a look at... Note the substrate higher in back than front. Sloping the substrate from the back to the front helps aid in vacuuming the aquarium during routine water changes. I must admitt I don't always follow this rule, I just add the sand in varying levels, creating mountains and valleys as I see fit. A heavilly planted aquarium means a lot less overall cleaning. The plants will happily feed off of the fish waste and some leftover food particles.
I've always used a mixture of sand and clay as the majority of my substrate. Both give a more natural feel and have major advantages over plain gravel. 1. Sand is cheaper. 2. It holds plants better keeping them from floating and aids in root development. 3.Good clay provides a rich base for plants to develope a fantastic root system. 4.Good substrate means less upkeep and fertilization costs. 5. Some fish species will DIE with gravel as a substrate. And some other scaleless species especially.) After you add at least 1-4 inches of substrate to your liking it's time to think about HardScaping. From time to time gases may build up beneath your sand, just gently stir the substrate with a chopstick or some other such thing.When using Silica (playbox sand) Sand do NOT breathe in the dust. Sand/Clay probably won't work with an undergravel filtration system. Hint: Topping the clay with sand helps keep your water from turning muddy.Hint: Use an old pillowcase and waterhose to wash large amounts of sand, as this removes the dust that can cloud your water.

Now that that's done, we move on to... -------------------------------------------------------------------------------------------------------------------------------------------------------------------- Decorating! Before adding water my 'hardscape" is laid out. Here's where a lot of people get into trouble. They've read and looked at pictures and been told exactly what not to do when decorating their tanks. Well, here's my advice, all two cents worth of it. Forget what you've been told. Go on FORGET it. As long as your set-up is suitable for the species of fish you plan on keeping, the rest is up to you. If you want to put that gaudy plastic Elvis in with your tetras, go ahead and do it. YOU have to look at this tank, not those other people. A few minor adjustments to the layout. Arranging things before the water is added makes things a lot simpler. When the time comes to fill the tank, place a saucer or some such thing over where you're pouring the water. This helps keep the substrate from clouding the aquarium too much.

It also keeps your plants/decorations from mucking up. Finally, time to Garden! Choose plants well suited to your lighting and aquarium size. Most plants are graded as either "High" "Medium" or "Low Light". If you place a high light plant in a tank with low light, it will eventually die. I've even heard some low light plants will die "burn up" with too many WattsPerGallon "WPG". This makes perfect sense if you think about it. Another good tid-bit to keep in mind, certain plants do best with plenty of food, know your plants.That's one thing I can't stress enough. Aquarium plants are expensive and no one wants to toss $10-100.00 out the door! A good thing to use as a guideline for arranging your plants is " tallest towards the back, shorter as you move forward." This is entirely up to you though. If your tank is happy, soon you'll need to trim your plants. I usually pinch with my fingernails as well as use scissors (like giving my java moss a haircut) to help ensure bushy controlled/healthy growth.

Most plants can be rooted, so save those cuttings in an extra tank/bucket! A note on fertilizing:I use Jobes Plant Sticks by breaking them in half and burying the pieces completely beneath each plant's roots. Some people claim these aren't safe for fish...but I've never had a problem using them. Maybe avoid this type of application if you have burrowing species. There are fertilizers epecially suited for aquariums, but I'm cheap, so there. Keep an eye out for one of my next Aquarium Tutorials on creating your own fertilizers. Perhaps the most important inhabitants in any aquarium. These are the "mostly" no-see'ums of the Aqua Pit Crew. They're responsible for taking care of ammonia, nitrites and nitrates as well as all other sorts of nasties. After your aquarium is set-up it starts to go to work. Most of the time you can't see the mysterious ways of this enchanting world, but trust me, it's there. The fastest way to get your Bio-Crew going is to "seed" your tank and filter with aged aquarium media.

Your local fish store or a friend's aquarium is a good place to start. Get the goo from their filter and put it in yours. Ask for a cup or two of their substrate and place it on the top of yours. Sprinkle a bit of fish food in for good measure. Make sure your filter stays running the entire time you're cycling your aquarium. I would wait a good 2 weeks before starting to add fish. Let the tank age and establish a good amount of bacteria to help with the upcoming bio-load. Add your fish 1-2 at a time and wait a week or more before adding more fish. The aquarium has to adjust to meet the higher bio-load of new fish. In a later article I will write exclusively about these critters and how to put them to work overtime for you. A list of plants for your Underwater Eden. Bolbitis heudelotii 'African Water Fern' Monosolenium tenerum 'Pellia' Taxiphyllum ferriei 'Weeping moss' Taxiphyllum montagnei 'Christmass moss' Microsorum pteropus 'Windelov Lace java fern, Windelov java fern' Microsorum pteropus 'Red Java Fern' Microsorum pteropus 'Needle leaves microsorum' Microsorum pteropus 'Narrow leaves microsorum' Rosette plants.

Cryptocoryne beckettii 'Crypt Beckettii' Cryptocoryne wendtii 'Crypt wendtii brown' Echinodorus ozelot Echinodorus tenellus 'Pygmy Chain Sword' Grassy Plants. Elocharis acicularis 'Dwarf Hairgrass' Eriocaulon sp. 'cinereum' Lilaeopsis brasiliensis 'Brazilian Micro Sword' Broad Leaved Plants. Anubias barteri 'Nana' Anubias barteri 'Petite' Anubias minima 'Anubias minima' Nymphaea lotus 'Zenkeri' Nymphaea pubescens Barclaya longifolia 'Orchid Lily' Plants -NOT- suited for aquarium use. Hemigraphis exotica 'Purple Waffle' Pilea sp. 'Aluminium plant'. Spathiphyllum wallisii 'Peace Lily'. There are many more plants that pet stores will try and pass off as aquatic. Do your research and bring a detailed list with you when you go plant shopping. If they sell you a misidentified plant, MAKE them refund your money or give store credit. "Where's the fish?" you're probably asking.This article is about setting up an aquarium, not about stocking. These are guidelines for you to follow and make your own.