fish tank to fit ikea expedit
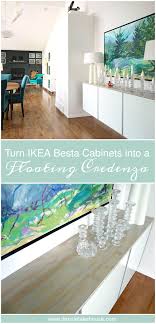
When we couldn't find the perfect dining room credenza, we made one! We turned three Now I'm sharing how we finished off the look with a sleek, grey-stained plywood top. (In these photos we still hadn't to hide the lamp cord holes, but already the faudenza looked so sharp!) If you would like to build your own budget-friendly, Ikea fauxdenza, read below for our full tutorial, plus tips and tricks for applying edge tape to plywood and staining/varnishing wood. For comparison, here is our floating credenza, back when it was topless. We used the "extension units," but Ikea changed up their links and some products since we made our purchase, but I . We used the Ikea to mount them to the wall. It looked cute already, but the seams gave away that this is an Ikea hack! The plywood top we built nicely disguises the fact that our "credenza" is really . I that this is in no way an idea original to me, but we did put our own spin on it. I really waffled about the finish and short-listed a walnut stain, the for the counters, and the .

I even considered a glossy solid aqua paint or stain. Dark wood ultimately didn't thrill me because it competed with the walnut-stained birch flooring. White was a little too matchy-matchy with the kitchen.
buy 6 foot fish tankTurquoise would have solidified my status as "insane blogger who paints everything turquoise".
buy fish tanks online in canadaI settled on the grey stain because I really wanted to try it after on our maple kitchen counters.
buy aquarium plants perthIt's a great neutral and complements , but doesn't compete with right beside it.
buying used acrylic aquarium
It also has a subtle driftwood look, which is my nod to beachy decor. And yes, I spent way too much time over-thinking this decision. The next tricky decision was determining what kind of top: solid wood, laminated solid wood, or veneered plywood?
fish tank to acidicSolid wood was ruled out because of (the Besta units are fairly deep).
buy 20 gallon fish tank ukWe didn't have the steam to make a laminated wood top - too much labor!! Veneered plywood won my heart because it was the easiest and cheapest solution. Once the big design decisions were made, we headed to the lumber yard and were faced with the decision (): what kind of veneered ply? I had some criteria: I wanted something with a yellowness to warm up the purple tinge of the stain, and I wanted something with a of grain so it wouldn't look like a flat slab of concrete.

We had a clear winner: good-one-side Caribbean Pine. It only came in 5/8" thick, so that answered that question about the depth. With the decision-making settled, here's how we turned Ikea Besta units into a chic floating credenza! Despite being avid DIYers, we still don't own a table saw and we knew (pun intended), because we needed the cuts to be exact. We simply brought the measurements of the credenza to the local wood supplier where we sourced the plywood, and the resident carpenter cut everything in minutes! It felt like cheating. With our pieces cut, we applied edge tape using an old iron. We applied edge tape to the front of the pieces that run along the side of the credenza, and across the front and both side edges of When it was adhered, we trimmed the sides using a double edge trimmer. We splurged on the tool, after for previous projects. Finally, we gave the whole piece a very light sand with 220 grit sandpaper to smooth any lingering roughness, especially between the ply and the edge tape.

Next I applied the stain, using an old brush. I applied it kind of messily (not wanting it to accidentally dry in really definitive brush lines), waited a few minutes and then wiped off the excess with a clean rag. I used a gel stain and found it had great coverage so I got away with one coat. I let the pieces dry overnight and then applied a quick-dry clear varnish, using a clean brush. As per the instructions, it dried within one hour but for sanding between coats it's recommended it dry overnight. I patiently waited, and the next morning gave it a light sand with 220 grit sandpaper to smooth any raised grain. Then I applied another thin coat and let it dry. One tip: don't forget that the edges might show when the credenza is opened, so stain and clear coat those spots too! Installation was simple, but we added a step: cutting holes for the lamp cords. We've rigged it up so the cords disappear through the top and meet inside, at the back, where we cut out a hole to the outlet.

We first laid the top piece on the credenza and placed the lamps to position the cord holes, marking them in place. Using a 1.5" hole saw Hubby cut the holes first through the plywood top, and then through the top of the credenza. He sawed through half from one side, then flipped and finished the hole from the other direction. Finally, we affixed the top to the credenza. To do this Hubby pre-drilled some holes in the credenza to be able to drive some screws up from the inside into the bottom of the new top. He did the same on the sides, drilling from the inside. Drilling from the inside reduced tear-out visible inside the unit. Starting with the top, we ran a bead of PL Premium construction adhesive all over the credenza surface, ensuring not to go too close to the edges so it didn't squish out. We put the top in place and drove the screws (two per credenza section) up from the inside to tighten the wood in place. Once the adhesive is dry the screws will probably not do much.

They are basically there clamp it tight during the drying process - although we did use an extra clamp on a place where the screw didn't grab perfectly. A little scrap of wood kept the metal clamp from damaging the freshly finished surface. With the top in place, we repeated the process with the two side panels. The sides are not actually attached to the top panel, only the credenza itself. We opted for a butt joint instead of a mitered corner because it's simple and our counters don't meet in a miter, so there's a subtle similarity only I will notice and enjoy. Here's the one thing we still need to do: order some grommets to disguise the credenza holes we cut and make them look finished (the same way grommets hide a hole in fabric). They are directly behind the lamps and difficult to spot anyway, but they will look really sharp when properly finished. Once the grommets arrive and we've snapped them in place, I'll show you in more detail what we did with the cords.