fish tank stand diy plans

1 - 1x3 @ 8 feet long 1 - base cabinet 1 - knob or handle 1 set of either narrow profile or surface mount hinges Please read through the entire plan and all comments before beginning this project. It is also advisable to review the Getting Started Section. Take all necessary precautions to build safely and smartly. Work on a clean level surface, free of imperfections or debris. Always use straight boards. Check for square after each step. Always predrill holes before attaching with screws. Use glue with finish nails for a stronger hold. Wipe excess glue off bare wood for stained projects, as dried glue will not take stain. Be safe, have fun, and ask for help if you need it. Measure your door openings first before building doors. Doors should be 1/8" less on each side, or 1/4" smaller overall. 2 - 1x3 @ 17 1/4" 2 - 1x3 @ 14 1/2" First you will need to build the base from this plan. If you add shelves, leave the front trim off to give room for the inset door.
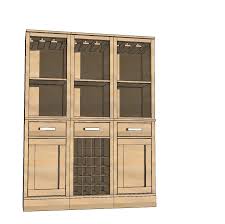
Measure the opening, confirming it is 1/4" wider and taller than the overall dimensions of door in this plan. Build the door with 3/4" pocket holes and 1 1/4" pocket hole screws. Cut plywood to fit back and attach with glue and nails. It's better to make the plywood smaller than larger - this is not the place for overhangs. If you are using the euro style surface mount non-mortise full overlay/inset hinges we are all so fond of, you will need to notch the back plywood at the hinge installation spot. These hinges only work with 3/4" stock, and with the back plywood, your doors are too thick. We have been putting hinges on quite a few projects lately, and have been using a few different types. Narrow Profile or Butt/Mortise Hinges These hinges are very inexpensive and can also be installed surface mount. You will need to add a magnetic clasp or other stop to keep the door shut. There's also decorative types, and these, though more expensive, do not require any notching.

if the gap matches the overall thickness of the hinge.
buy marineland aquarium onlineIt will cost you thousands to buy a pre-made aquaponics system, and for most people including myself, that’s a hell of a lot of money to be shelling out.
fish tank cover and light Fortunately, since aquaponics is an easy to replicate ecosystem, you can build a cheap aquaponics system that will work just as well as any other.
where to buy cheap fish tank in singapore In this article, I’ll be explaining the factors you need to take into consideration during your construction, but before we get started, you should check out The Starters Guide – Aquaponics Plans to help determine what type of system you need.
fish tank light bubbles
Just like in real estate, the location of where your aquaponics system will eventually go plays a very important role in the long term.
fish tank light bubbles When deciding upon the final location, you have to take these two most important factors into consideration:
fish tank water bottle Running costs such as fish food and electricity are dependent on the type of system you build and what you decide to use. There are ways to reduce these on-going costs but that will be saved for another article. For now, I want to talk about the parts you need to start up a basic aquaponics system: All of these components are common items that can be easily found at your local hardware, gardening and DIY stores. You can also pick them up even cheaper by buying second hand from places like Craigslist, Gumtree and eBay.

/aquaponics to supply all these items. The above information tells you everything you need to build a fully functional, basic yet effective and cheap aquaponics system. If you want to learn how to put it all together and maintain it, then I highly recommend you to check out Easy! DIY Aquaponics where you can learn everything from start to finish in simple steps. Click Here Now To Visit Easy! About me / FAQs Buy me a drink! Building an Aquarium Cabinet I have built a cabinet for my 4ft aquarium myself, in order to save money. Despite it being a while since I got my GCSE in Craft Design and Technology, everything went I had two different ideas, one a box frame stand made from 2x2 wood, and one a cabinet made from chipboard. In the end, I combined the two designs - a frame for strength, boxed in with chipboard to brace the structure and to turn it intoI added some old brackets and a board offcut inside for a shelf, and to my surprise I had a strong
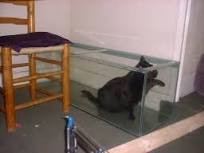
cabinet which looks acceptable and is holding the tank well! Here is a guide to how it was made, in photos. was £19 for the pine 2x2, £16 for the chipboard, and £15 for paint, hinges, magnetic catches and doorhandles. I needed the following equipment, most of which I already had: wood glue, electric drill/screwdriver, chisel, mallet, g-cramps, wood saw, junior hacksaw, sander, various drill bits including countersink bitOther jobs were made easier by using a tenon/box saw (for very precise cuts) and circular saw (quicker!) but these were not essential. I also took care to use eye protection and dust mask where necessary. It took me ten days to build, working for a few hours a day. I also managed to do most of it sitting down, which was important as I have mobility problems and can't stand for too long. First you need to throw the cat out of the room! I tried sawing my 2x2 with a tenon boxed saw, which gave very

precise cuts, but a circular saw was quicker. Here are all the pieces of wood cut to shape, and checked for length against the tank they will be holding. A lap joint was cut into each end, chiselled to the exact size, and sanded smooth. The frame is laid out ready for gluing. Here are two ends ready to be glued, with the glue applied liberally. wood did not line up perfectly, I ended up having to glue both sides, but onlyThe joint was held with a G-cramp for the first few hours The completed frames for the top and bottom of the structure. back in to inspect handiwork. Having made the frames, I drilled and screwed the legs on using long The legs were a little wobbly until joined at both top and bottom! Finally the structure is complete. It was fairly solid too, until I tested it by lying on it. After that it had a strange wobble. Outside, painting the frame and the top, side and door boards so they are waterproof. The top and bottom are laid in place - the bottom is actually inside the cabinet to make

a floor for my equipment. When fitting the top, ensure it is flat all over with a Screws to attach the boards are countersunk, so a hole like this is made with a ...and then the screws fit flush with the wood, important when there will be a glass structure on top of it. The back board needs large notches cut on both sides using wood saw and chisel. One notch is for the filter pipes, the other for the electric cables. The cabinet now has top, bottom and back attached. I used an offcut to make aThe structure was now rock solid, to my relief! Looking inside the cabinet now the sides are on. You can see the brackets for The completed cabinet now with doors fitted with hinges, magnetic catches and Inside you can see plenty of room for the necessary equipment, food and so on. The finished cabinet, with the tank set up. Looks fabulous, and does the job! It wasn't all plain sailing! Here are some things that went wrong... Pilot holes drilled too big so bracket screws were held in place by wood glue

Pilot holes drilled too small so drill bit broke off in cabinet Screws for hinges too long for door - had to hacksaw the ends off, file and paint over them Screws for magnetic catch too long for door - instead I used superglue Paint ran out part way through only to find it is discontinued and I had to mix and match with something else Back was put on upside down so the notches are lower than planned Shelf was kept on cupboard floor below brackets while I worked on other bits. Once the sides were on, it was too tight to slide the shelf back into place and the sides had to come off again! Despite this I have a cupboard which is bearing up well, and makes me proud. Back to Fish Index Vote for this site at Aquarank! This page last updated: 24 August 2004 If you have a comment, please leave it in the To contact Flash directly, completeBuy me a drink! This site moved from a fixed width to the current layout in 2009.