buy aquarium 3d background

WELCOME TO DESIGNS BY NATURE We are committed here at Designs by Nature to bringing you the largest in stock selection of the highest quality aquarium and terrarium backgrounds & decorations in the United States. Our goal is to provide our customers with items from around the globe that will help you make the most natural and comfortable habitat for your animals. You are only limited by your creativity and imagination in what you can create with these backgrounds. Finally you can create that natural looking biotope you have been waiting for. We have come a long way from our blue backgrounds and bubbling treasure chest days!! If the design you are looking for shows "out of stock" please drop us an email and we can try to track down the piece you want. And if you\'re needing a custom size and you don\'t see it listed in the design you want we can try and arrange that also so please let us know. We will be adding tons of pics of each piece to show as much detail and angles as possible.

Please keep in mind all of these pieces are hand painted , so they may vary slightly in shades from piece to piece. Most pieces will be shipped via UPS and usually will leave our facility within 2-3 days, Mon - Fri, we can also arrange international shipping if needed Please sign up for our newsletter to stay up to date with all of our new items!! Please feel free to comment on any of our posts, images or designs, we would like to hear your feed back. If you have any questions please check out our FAQ section or drop us an email at sales@designsbynature.net . You will not find a larger selection of in stock backgrounds anywhere else in the US, with more and more added each week! Used & new (3) from $77.00 Universal Rocks 48-Inch by 20-Inch Rocky Flexible Aquarium BackgroundDetailsMarineland Silicone Squeeze Tube FREE Shipping on orders over . Save Big On Open-Box & Used Products: Buy "Universal Rocks 48-Inch by 20-Inch Rocky Flexible ...” from Amazon Open-Box & Used and save 10% off the $85.56 list price.

See all offers from Amazon Open-Box & Used. A fantastic replica of a Natural looking rockface, made from a lightweight thin flexible material that takes up no more than 1-inch of your aquarium or reptile enclosure giving your pets a natural enviornment to feel at home in. 48 x 1 x 20 inches ; Shipping Weight: 4.4 pounds (View shipping rates and policies)
buy fish for aquarium online india Item model number: 48x20-ROCKY
buy fish tanks online in canada #45,369 in Pet Supplies (See Top 100 in Pet Supplies)
cheap aquarium chiller in Pet Supplies > Fish & Aquatic Pets > Aquarium Décor > Backgrounds Zoo Med Mesh Reptile Hammock, 17.5-Inch Universal Rocks 48-Inch by 20-Inch Ledge Flexible Aquarium Background

Exo Terra Foam Backgrounds for PT2613 5 star65%4 star27%3 star7%1 star1%See all verified purchase reviewsTop Customer ReviewsI wedged the bottom in with some rocks and after six months it has not given me any trouble and still looks great. My Chinese alUniversal rocks 48" aquarium background.Was so excited to get this for our ... Like a Professional AquariumGreat quality but a project to install, must use siliconThis product looks great. See and discover other items: aquarium dragon, iguana pet, lizard habitats, lizard aquarium, reptiles aquariumShow All ItemsI made this background for my 120 gallon aquarium. It was actually pretty easy to make but it was very time consuming and messy. I'd definitely do it again though! It was a lot cheaper than buying a custom made background and you can make it exactly how you want it. This instructable will walk you through how to make one of these backgrounds. You can adapt this to any size tank. The materials I used are fish safe.

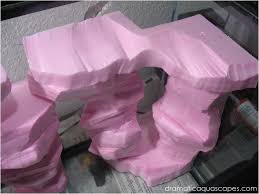
***Note: This is only for FRESHWATER aquarium use!!!Step 1: INGREDIENTSShow All Items*Note* This is an installed, permanent background. Be sure you are willing to dedicate a tank to this background and plan on it not being ready for fish for several weeks. Don't buy your materials and your fish at the same time unless you have a spare tank. The key is to not rush this!An empty fishtankOwens Corning pink insulating foam sheets100% silicone (it is very important to use 100% silicone with NO additives. Avoid any silicone with mildew inhibitors etc as these types of silicones are not fish safe. Oh, and get more silicone than you think you need, you will use a lot!)Serrated foam cutting knife (I used my kitchen bread knife ha ha)Bamboo skewersToothpicksDrylok hydraulic cement (my 120 gal background took 3 buckets)Liquid cement color pigmentsCheap, disposable paintbrushesDrop cloth (or two or three or four!)Tape measure and rulerMarking penWire cuttersStep 2: Plan AheadConsider the type of fish you plan on keeping and plan your background accordingly.

You want to create a happy environment that your fish will enjoy. Measure the back of the tank and cut a piece of thin foam that size. For larger tanks like my 120 gallon, I had to build the background in two pieces. For smaller tanks, this is not an issue.Dry fit the foam sheet(s) into the tank and trim where necessary.Plan where your filter intake and heaters will go! Build the background according to where these areas will be. I planned a little alcove around the filter intake.Plan on continually dry fitting your background into your tank as you build it. The last thing you want is to get it all ready and it not fit! I'm not saying this happened to me or anything...Step 3: Start Carving!Show All ItemsI carved my rocks as I went and kind of let the background form itself. Keep a general plan in mind but don't try to control it too much. Have fun with it!Using the serrated knife, start carving pieces of pink foam into shelves and rocks as desired. Keep in mind that the cement will fill in a lot of crevices in the foam so don't worry about perfection.

The foam is merely the base. To create larger protrusions, stick blocks of foam together with silicone and bamboo skewers. Let the silicone cure and then carve away what you don't want. I looked up images of rocks (especially slate) to inspire me.If you like the slate look, see the above pictures to see how I carved it. You can do more rounded or blocky shapes too. Whatever you do, it'll look great once the cement is on it.This should go without saying, but it's really easy for the knife to slip and cut your hand so be careful! You will need all your fingers later to install the background.Carve your textures deeper and more drastic than you would think. The cement will fill them in a lot!Step 4: Start Putting It TogetherShow All ItemsI used bamboo skewers and toothpicks to support and strengthen as I built. This will hold the pieces in place as the silicone cures. Use wire cutters to trim the skewers when necessary. I wanted to graduate my background as it went so it came out farther at the bottom and tapered at the top.
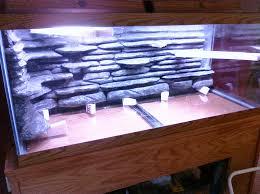
Important: I have had a few tragedies with fish getting caught in store bought aquarium decorations. I kept this in mind as I carved. You don't want to create any death traps for your fish. Avoid small sharp holes. The fish need lots of room to swim. Remember you can use the concrete to fill in any gaps you don't want.Step 5: Build, Build, Build!Show All ItemsKeep building and fitting. I built my "rocks" onto square sheets and then trimmed a rough organic edge at the top.Step 6: Cement Time!Show All ItemsThis part is very messy. I used an old sheet as a drop cloth. This step is very time consuming. Allow several hours between coats and you will need to do at least four. Mix the cement in small batches. It sets up very quickly. I used extra water (2 parts water to 3 parts cement) so it washed over the foam nicely. Mix the cement with cold water to increase the working time. You only have a few minutes to spread it before it starts setting up.Coat the background two to three times with cement.
Let the cement cure. If it feels cold to the touch, it has not cured yet.We will add pigments in the next step.Step 7: Add a Color LayerShow All ItemsFor your fourth coat, use cement pigment to stain it a nice dark color. Paint the entire background with the dark colored cement. Mix it watery so it gets in all the crevices!We went back in and touched up some areas with brown colored cement to add interest.Step 8: DrybrushShow All ItemsYour last coat will be using the original uncolored cement. Lightly dry brush the cement over the background to bring out the texture. Only use a little bit, this is just for looks.Leave the recessed areas dark. Step 9: Rinse, Repeat....Show All ItemsAfter the background is completely dry, give it a good rinse to get rid of any residue and dust. Let it dry again.Step 10: Install ItShow All ItemsIt is important to create a good seal to the glass. You don't want any fish getting back there. Kuhli loaches, I'm talking to you! Use lots of silicone to adhere the background to the wall of the tank.

Brace the background with foam while it cures. Let it cure overnight.Step 11: Fill the SeamShow All ItemsIf you had to build your background in more than one piece, you will have to seal the gap while it is installed in the tank. If not, you can skip to the next step!Mix up some more cement and fill in the gap. It took two thick coats to fill. Clean up any excess cement off of the glass. Don't worry if it looks bad, it'll look good once you fill the tank.Step 12: Seal and PaintShow All ItemsRun a bead of silicone along the edge of the background. If you get it on the glass where you don't want it, a little rubbing alcohol will soften the silicone enough so you can scrape it off. If your background has an open area like mine, paint the back of the tank with a desired color. I just used acrylic craft paint because it's easy to scrape off if I get bored with the color.Step 13: Setting UpShow All ItemsFill the tank and get the filtration running.Test the pH of your water before adding it to the tank.