betta fish tank peace lily

Today’s blog embodies the main reason I blog…..It involves the two things that sometimes get in my way when I get one of my ideas…….1. When I research it on the internet, sometimes I can’t find anyone who will give me a “concise” set of directions that includes ALL I need to know. 2. There are folks out their who are super serious about the topic & can only give me the “rich man’s version” or the “I only feed my carnivorous plants organic bugs I pick from my own bug sanctuary” lecture (in a snooty tone, no doubt). After I get my research together, certain things were left out – like the difficulty of one of the steps. Here’s how my Betta Fish/Peace Lily Aquarium in a Vase project went! ~A Vase – You know you have a bunch from the florist that you aren’t using or you know someone who does..Find a big one… preferable clear – without ridges/frosting – so you can see your fish! ~A Clear Plastic Cup - Something Clear to Keep your plant grouped closely at the base & your roots suspended in the water.
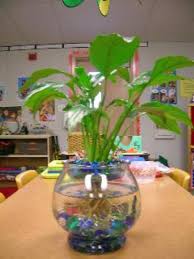
Play around with it & get one that is a good fit & doesn’t fall into your vase. Look around your house – you might have something besides a cup. I used the top of a disposable water lily container. ~Tap Water – is FINE. ~Conditioner - to De-Tap your Tap Water. The pet store can help you with this. You’ll need to treat your water before the fish goes in there. ~Betta Fish Food Pellets – Fun times. You’ll have to watch him/her eat the first time, and it’s possible your pre-disposed finicky fish with spit it up. This means he doesn’t like your food, and you might have to get a different kind. We are waiting it out….. ~A Peace Lily – This is the only plant you can put in there. They sell them at some pet stores. If you have a small vase – get one from there. It will actually be ready to go & have separate instruction. If you have a bigger one like I did – you can go get a plant from any nursery. You don’t want the BIG “floor” plant. ~Accessories – like Rocks and/or a figurine: I am finally finding a home for the rocks and sea glass I found in Italy!

I also got a small figurine from the aquarium department of the pet store (columns). ~5 gallon bucket – or something you can get dirty ~A Betta Fish – I got a male, crowntail fish. He’s cornflower blue with a red fin/strip thing on his side. Insert snooty joke here. Take some time & get one that’s lively. If it never gets off the bottom of it’s cup in the store while you’re there…… it’ll do the same at your house. It might have Bettafish-itis. I had bad luck with one in a regular pet store. Consider going online with an actual breeder. You never know how old the ones are in the store. ~Cup Measure – for transferring your new friend into the vase with less trauma. NOTE: Do this during daylight – outside – when you’ve got some time. Depending on your peace lily, you may have to use up some extra time/patience to get everything just right. 1. Place your rocks/accessories in a strainer & rinse well. 2. Wash the vase & rinse it ….. 3. The hardest part of this super-easy project…

Take the peace lily & the bucket outside to your hose. Fill the bucket – put the peace lily in there – & start gently moving your fingers around it to get the soil to fall off, releasing the roots. This is going to take a bit of time. You want to get ALL the soil off there. The black thing underneath the root base is not soil & should not be picked at.
betta fish tank keeps getting cloudyIf you’re like me & you worry that plants are fragile…..
wechat 操作太頻繁This project helped me get over that.
best fish tank filter 10 gallonIf you break a root, it’s okay.
aquarium air pump ornaments
We are going to trim them…. Now feed the roots through the whole of that cup. Roots should be sticking out the bottom of the cup. Put your plant roots/cup barrier in some water until you’re ready for transfer. You can skip all this…. And get a lily from the pet store near the betta section.(may require a smaller case) 4. Once clean of soil – grab your scissors.
acrylic fish tank backgroundTrim the roots so they are about the size/shape of a softball or baseball – depending on the size of your vase.
marine aquarium shop kl 5. Use those scissors to cut a Silver Dollar sized or vanilla wafer-sized hole in the base. (depending on the size of your vase…..) 6. Place the rocks in the bottom. Place the accessory in the bottom, if applicable. 7. Fill vase 2/3 with water. Follow instructions on conditioner, and treat your water accordingly with the correct dose.

8. Scoop some of that new water out with your cup measure – filling it about 1/3 full. Over the sink, slowly empty your fish’s cup water until just barely over his/her body. Slowly, transfer him (with some of his old water) into the cup measure. Then slowly – release him into the vase. 9. You might feed him 3 pellets now before adding the plant. If he doesn’t eat something – get it out. If he spits it up…. You’ll know he’s finicky. Once you find a good food – he/she needs food everyday – according to the instructions on your food. He will also munch on the roots of that plant occasionally, but that isn’t enough – make sure you feed him/her! 10. Add your plant/cup barrier! Maintenance: Once a week or every two weeks, depending on how the water is looking, you need to carefully take your fish out so you can clean out the tank & put in fresh water. Snacks/treats: Apparently, they like dried bloodworms. You can get these at the pet store. You can also get little shrimps….